Tuesday, October 8, 2013

SUSTAINABLE GARDENS IN CANADA

WOW!!!! Just realized it has been quite a while since my last post.  My how time flies.  If someone told me I would be spending the summer gardening, rather than hiking, mountain biking, diving, or touring in the car, I wouldn't have believed it.  But here it is, October and the gardening is winding down....  OR IS IT? 

Who'd a thunk I would be involved in Aquaponics, Squarefoot gardening, hoophuts, greenhouses, cold frames etc etc etc, a year ago.  This all started with my wife making a keyhole garden last year.  It produced so much food for us, I figured I would jump on the band wagon and help this year.  After all, my wife D, had 600+ mason jars to fill with food.  Back in December, she showed me a youtube video of an Aquaponics system in Australia.  Since I hated getting dirt under my nails (for 30 years now)  I figured I could contribute by making the fish to veggie system in the basement of our house.  I promised D I would help with the dirt gardens, after I bought her Mel Bartholumew's book Squarefoot Gardening. 

The planning for it was left to D.  She calculated we needed four 4x4 ft gardens to sustain the two of us.  So when it came time to make the frames, I made EIGHT.  Ok so I don't listen, but we did have 600 jars to fill.  Eventually, we ended up with ELEVEN.  I was in charge of seed planting in the house, and the aquaponics.  Like the SFGs I was a bit extreme.  160 species of plants were seeded. Everything from veggies, fruits, herbal meds, flowers, catnip, hell, I even saved apple seeds, grapefruit seeds and my beloved Keylime seeds.   Since I knew nothing about gardening, I had to go on the side of percentages.  The more I planted, the more would grow.  Thanks to the internet and input from everyone under the sun, we started to have successes.  Here is a photo history of the garden project.


This is the start of the SFG.  Eight 4x4 ft gardens.  My job was to make the frames, haul the dirt up the mountain into the backyard.  D got to line the frames with cloth, mix her special mix of dirt, compost, and perlite, and transplant the seedlings.  The day we got the seedlings planted, the weather guys were calling for frost. We scrambled to make the hoophuts to save the crop.


This was the result of the hoophut scramble.  It worked great.  No plants suffered.  Note the uncovered garden to the right.  D is masterfully calculating the exact location for every plant.  Also note, the pot at the lower left has a piece of plexiglass on it.  This was a two-fold success, it kept the plant from freezing, and it kept the damned cats from eating it, it was catnip.  The trellace in the back row is made from 1/2" conduit, and is for the beans and peas to grow onto.  It worked great.


I made a stand, to mount a grow light, using a fluorescent light fixture.  I had it sitting on the counter over our beer and wine fridges.  D put the tyvek cover on it to keep the seedlings warm.


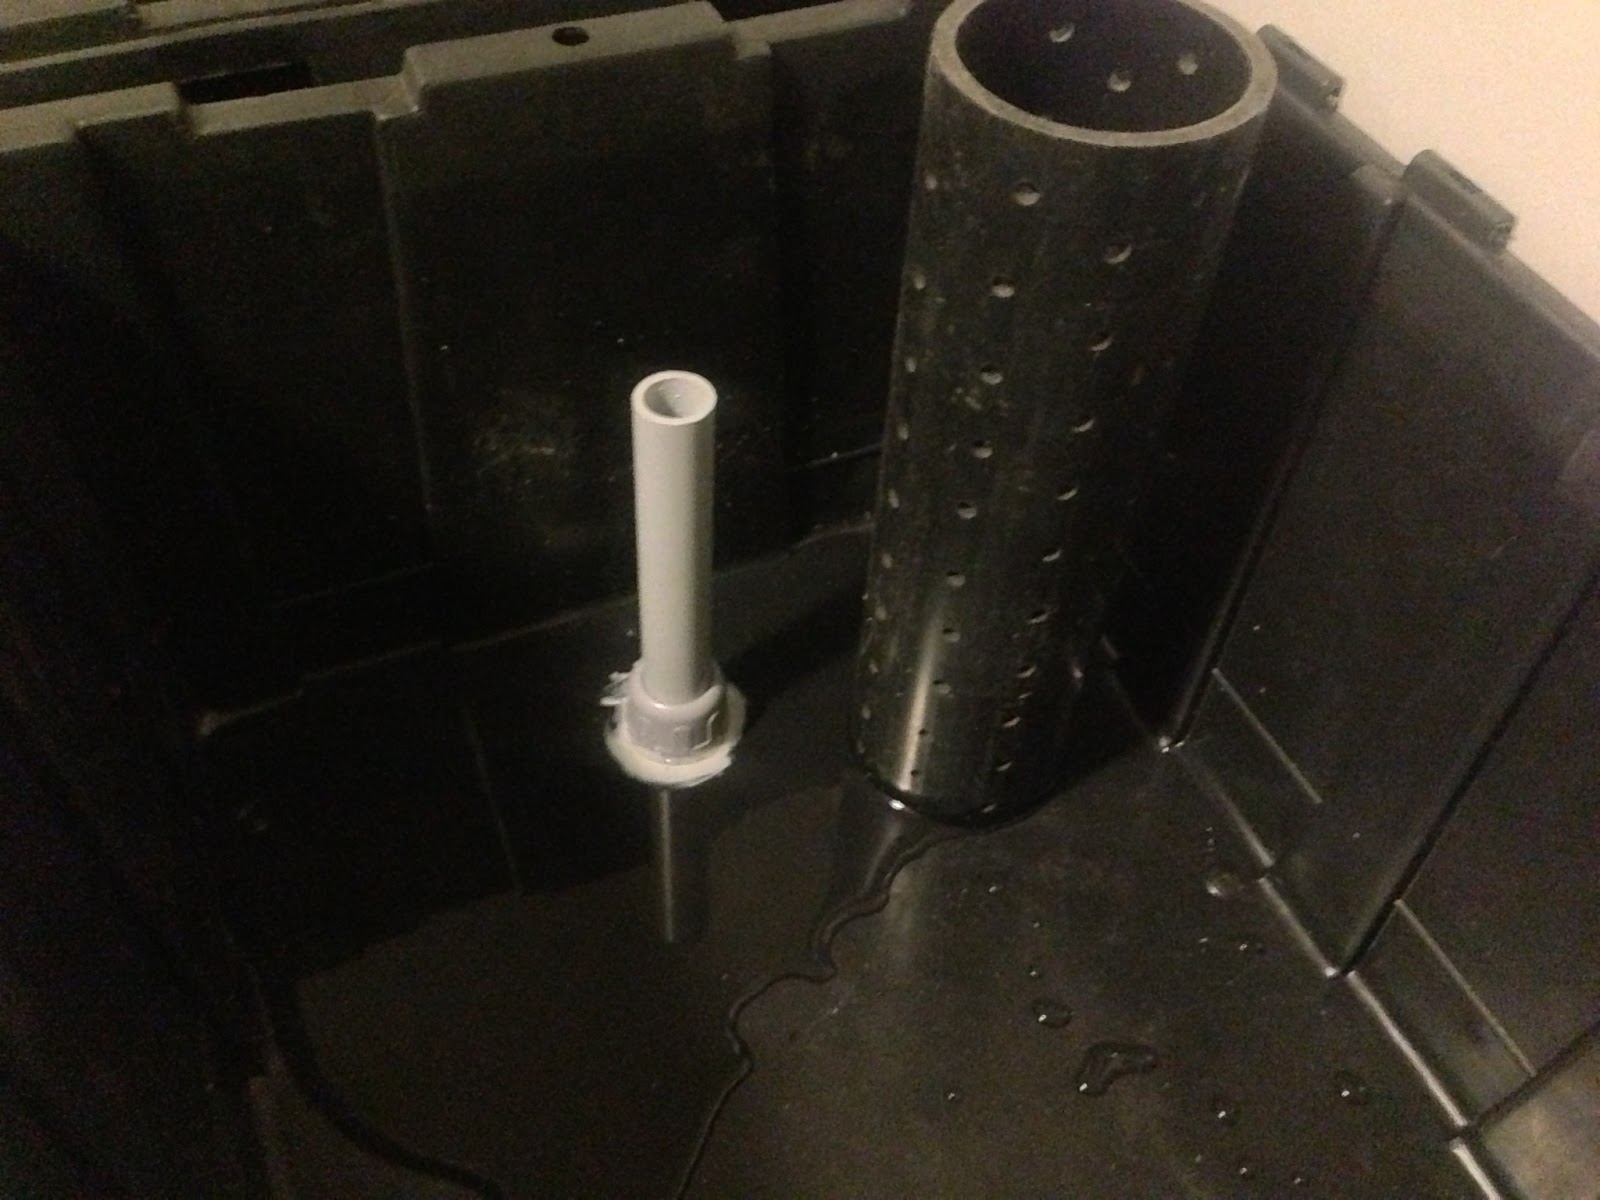
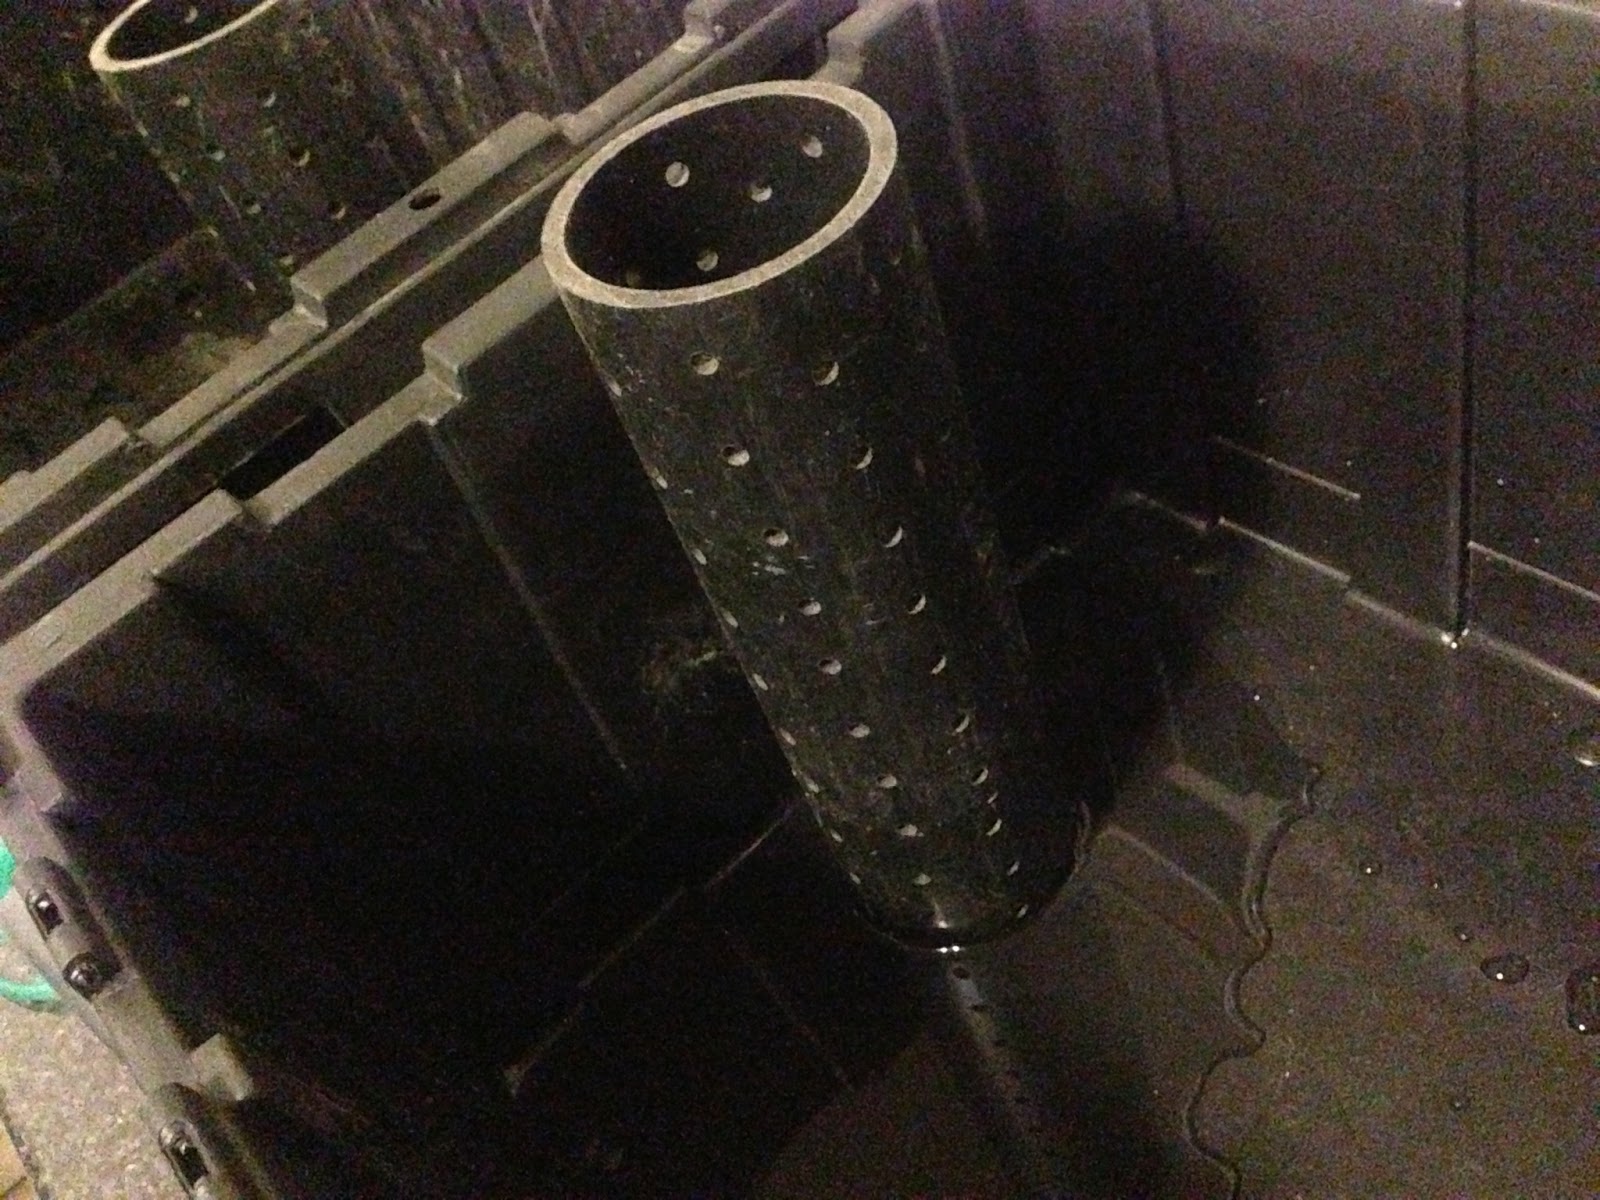
This was the aquaponic setup, and my indoor greenhouse for the seedlings.  I used CFC full spectrum lights in the greenhouse and the seeds loved it.


This is one of two grow beds in the aquaponic system.  Those are Jalepenos and Gypsy peppers.  To the extreme right, are tomatoes that grew to the ceiling.


Who ever said gardening was relaxing never had neighbours like these looking in on our progress.  That bruin is about 20 ft from the gardens, biding its time until I would leave.  This guy showed up about 8 - 10 ft from where D and I were working on our retaining wall.  She saw it first and ran.  THEN and only THEN told me there was a bear 3 steps away.  My first assault was with the broom, bounced off, then the shovel, again bounced off,  then rocks..... ok ok.... anyone who knows me, KNOWS I can't throw anything. However, I did manage at a distance of 8 feet girly toss a few rocks and connect.  That was enough for me, I brought out the big stick.  As soon as the bear saw I meant business, he climbed the tree to wait me out.  For the record, the big stick is just that, a BIG STICK.


That ain't no super telephoto I am using.  That squirrel on steroids would not leave.


I took this photo in more or less, a RAGE.  That beast sat there swinging his foot back and forth, with his bear nads hanging down.  Determined to taunt me into leaving.  D insisted she didn't want a bear skin rug. 


As the seedlings started to grow rapidly, we transplanted them into buckets.  We found we needed every available space, including our cats railing walkway.  Everyone had to sacrifice for the sake of the garden.  This is our herb gardens.  Thyme, Chives, Parsley, Catnip, Anise, Cumin and Stevia.


When the weather got warmer, the hoophuts came off, and everything exploded.  We still had hundreds of seedlings to find homes for.  I had created a monster.  I had no idea the success rate for germination would be so high.  I estimate about 80%.


Sunday, March 17, 2013

AQUAPONICS UPDATE MARCH 17

GOTTA LOVE AQUAPONICS

Now this is the type of gardening I like.   After the initial setup of the system we let the pump cycle for a few weeks.  This really wasn't needed but we wanted to make sure all was well before we spent billions (ok ok maybe 10 bux) on fish and plants.  We bought a couple of the Jiffy Greenhouses.
These units come with little 'pellets'.  We call em coccoons.  Simply add water, they swell up, put your seeds in them and wait.   Everything worked well except the cukes.  We had one sprout and it has been going crazy ever since. 


Starting the transfer of plants to the grow beds

The Kale, Lettuce, Tomatoes, Peppers and a few of the herbs were growing as much as 1/2 inch (.5 cm) a day.  We only used water from the tanks to feed the plants.  When they were big enough, (we guessed at what was deemed 'big enough') we started planting them in the garden.  In retrospect, I should have planned it a bit better.  We put tomatoes and cukes together with onions and kale.  Next time around we will put the shorter plants in one grow bed and the taller growing ones in the other.  That way the cages won't block out the light to the little guys.

The tear drop on the paper is what we call a Kanban. My past is catching up with me.  This is a signal to let me know if Denise watered the plants that day. 

About the fish.   We used feeder fish (the cheapest you could buy in bulk).  I set up a glass fish tank and had them all in there until they became acclimatized.  Then put 15 in the aquaponics tank.  We had a few (3-4) die but the rest are going great.   I keep track of the Ph, Ammonia, Nitrites, Nitrates etc etc and all are within the so called correct parameters.  At first we had jump started the system (before the fish were introduced) by adding some ammonia to get things going.  Must have put too much in so we diluted it.  Now everything seems to be balancing out.  Need more nitrites / nitrates?  Toss in some more fish.  10 seems to be about right for now. 

 
After 6 weeks
 

This photo was taken 6 weeks after we had initially planted the seeds.  I had to replant some of the cukes, as only one grew.  Hopefully we will have more success with the new batch.  They should be ready just in time for outside planting. 


Denise's Porta - Greehouse with Jiffy pellets soaking up water.


Now the Plants have more space to grow
 
Denise assembled her portable green house to expand on the seedlings.   Now that the cukes are coiling around everything we put the wire cages in the growbeds for the tomatoes and cukes to grab.  Note the peppers in the far grow bed.  I built a makeshift shelf above the cukes to hold the smaller Jiffy greenhouse.  This one has just been seeded with Beans, Peas and Lettuce. 

I have noticed that some Aquaponamians (what ever ya call people who aquaponicize) do is plant the seeds directly into the grow media. Might try that in the future, but we wanted to control and document the growth rates of the plants.  YES DOCUMENT.  I have a book I have been keeping track of the chemical make up, how much water we need to add weekly, and what seeds, and where we have planted them.  I want to seed the most hearty of the plants for next year's crop. 

Friday, March 1, 2013

A LETTER FROM A DOCTOR REGARDING SELF DEFENSE

This letter was sent to the Canadian Shooting Sports Association by Dr. Mike Ackermann - Sherbrooke, NS.  It is definitely food for thought.
GUEST COMMENTARY:  Nova Scotia doctor takes strong position on self defense
Dr. Mike Ackermann is a rural doctor in Nova Scotia and former member of the Canadian Armed Forces. His total respect for, and love of life, has led him to have a bone-depth belief in the sanctity of human life and the absolute right to its effective and timely defense. As a result he has made a study of both the healing and the martial arts. The use of hands and feet, horse, bow, sabre, rifle, pistol, shotgun, and Medicine are all disciplines he studies to protect life. Mike Ackermann believes that each one of us is our own first line of defense. He shares his observations on self defense with CSSA E-News readers.
Evil people will always exist. You cannot hug them into goodness. Good people will always be at risk of assault and worse from those who lack human compassion, regardless of how idyllic we may think our society has become.
The gun genie is out of the bottle and won’t be put back in. Laws of disarmament only disarm the lawful, leaving criminal individuals and governments unaffected and unopposed.
Despotic governments, who by the way are very strong proponents of restrictive gun laws, are responsible for the genocidal murder of nearly 200 million of their own, disarmed and helpless citizens in the last century alone, far more by orders of magnitude than all other murders combined. Anti-self defense zealots in the so-called women’s and victims’ rights groups are their "useful idiots”.
Even were it possible to somehow make all firearms magically disappear, the world would hardly become a pacifist paradise, no more than it was before the advent of the firearm. In those days the world belonged to the young, the strong, and the lords, who by and large took what they wanted, when they wanted, with little concern for concepts like "rights" or "decency".
The firearm changed all that, allowing the Feudal system to be replaced by democracy, and the weak to have a defense against the strong.
Peer-reviewed criminological studies have repeatedly shown that jurisdictions that encourage effective and timely personal defense see double-digit reductions in assault, rape, and murder, whereas those
regions where personal defense is panned see no such reductions. They have also shown that compared with all other courses of action, including passive compliance with an assailant’s demands, armed self
defense results in the least risk of injury to all parties, criminal included.
Ordinarily when an assault occurs, the advantage lies with the assailant who, aside from the victim, is the only one present during the attack and who also gets to choose the time, place, and manner of attack.
A 55 kg woman facing a 100 kg assailant would do well to avail herself of the only tool that can swing the power imbalance in her favor – the defensive firearm. Whatever else they may be, violent sociopaths are not stupid and they will do all in their power to gain and consolidate their advantage over their intended victims. Thus they are gleefully in favor of restrictive gun laws as well. When faced with a choice of targets, they will pass up the harder target in favor of the weaker.
So those who claim to be concerned for human welfare and safety should be strong proponents for personal armed proactive self defense, but ironically many have the opposite view. They blind themselves the defensive life-saving uses of guns that outnumber the harmful abuses by two orders of magnitude.
When you are under attack, and if you are even able to call 911 at all, what you are asking for is for someone else to bring a defensive firearm to your aid. You will wait the rest of your prematurely truncated life for succor, which will inevitably arrive too late to do ought but draw chalk outlines around your cooling corpse and gather evidence for trial.
This does you little good, and is in every way akin to calling a mechanic to install a seat-belt in your car and put it on you only after you are in the middle of a crash.
- M.J. Ackermann, MD (Mike)
Rural Family Physician
 

Friday, February 15, 2013

MAGAZINES FOR THE PREPPER: A REVIEW

PREPPER MAGAZINES


Here are a few magazines I have found to be chocked full of information any Prepper would love to have.  I am sure there are a lot more on the market, but these are the ones I have found, bought, read and felt suited for a review.  These magazines aren't necessarily just for the Prepper, if you like living off the grid (OTG), like making your own tools, a Survivalist, Back Country Adventurer, there might be something for you.


THE BACKWOODSMAN

This is one of my absolute favorites.  I read it cover to cover almost as soon as I get it.  When I see it in the store, I am like a kid at Christmas.  Want to learn how to make Cattail Pancakes? Flies for Fishing? Tortillas? Need a review on a Ruger Mini-14? or a handmade .54 Cal Pistol?  This magazine has it all.  For the record,  all the examples I just gave came from ONE magazine, and there is a lot more.  This magazine is well rounded, covers a world of topics, and gives directions on how to make almost everything from nothing. 

The magazine is a family affair so to speak.  The Richie Family that is.  The boss-man, Charlie, is like your 'odd' Uncle. Let me explain that one.   Some people have that one uncle who does things differently.  Mom tolerates him cause he is her brother and loves him unconditionally, Dad goes to visit him to see what the heck he is up to now, the kids love to visit because he has the neatest things to see, and a new project going all the time.  Loved by all, listened to by many, his writing has a knack of drawing you in and liking him immediately.  Totally down to earth in his approach to self-reliance, and not condescending.   He also has the ability to draw in like-minded contributors for his magazines. 
 
At the back of each magazine is a classified section for those who want to sell / buy anything from land to primitive weapons. If that is not enough, if you look closely, there will be little snippets of information between some of the articles, where there would normally be a little empty space, but Charlie manages to put a 2"x 2" gem about what to do with jelly jars.
 
If you are unsure?  If you think I exaggerate?  Take my 10 minute test. Grab one at the news stand and read two things,  Notes From Charlie, and Letters from The Readers.  Charlie has a following that is loyal (I'm one, and I never met the man).  They thrive on his information,  which is to the point, and honest.  A subscription is a perfect stocking stuffer or birthday present for the Prepper in your family.  
 
My Likes:   Easy to read, Covers almost every topic, Letters from Readers, Diagrams for us simpletons.
 
My Dislikes:  Now that I have a subscription and don't have to search for it, NONE.


LIVING READY
 
To the point, this is not a magazine for the pacifist, or those looking for info on how to harvest onions.  This one is more (they will hate me for this)  Militant.  PREPARED, SKILLED, AWARE is their battle cry, and they sure want that point expressed to readers. 
 
If you want firearm reviews, they have it.  Want to know about knives, they have it.  The ads speak for themselves.  Lots of knife and firearms vendors, with full page ads for the well prepared Prepper.  I found one article that had one of the best explanations of Mil Dot and Minute of Angle for long range shooting, I have ever seen.  Clear and easy for me to understand.   
 
 Now, for those who may be less inclined to buy this magazine based on that, there are articles on other things.   Think you have Bug out Bags figured out?  After reading several articles in Living Ready, we revamped our BOBs because of the common sense suggestions found in the magazine. Ever wonder what is the best firewood?  No?  Read The Ultimate Firewood Stash if you think you had an understanding.  SURPRISE. Interested in Ham Radios?   Yup, they got it.  Ever get your car stuck in the snow?  ruts?  One article has 10 ways to get yourself unstuck. 
 
Among other tidbits, there are a spattering of articles about survivors tales of terror so to speak.
 
My Likes:  Firearms, Knife, Tomahawk Reviews, Specialized Ads for just about anything, Family Protection Articles.

My Dislikes:  Makes me want to rethink my firearms with every ad and article (which might not be a bad thing). 


THE NEW PIONEER

This magazine is for the self reliant Prepper.  Where to start?  Where to start?  Heating tips, Living off the Grid, Gardening, Solar, Thermal, Selling your products etc etc etc.   If you want to live off the grid, BINGO, you have made it to MECCA.  If you hate advertisements, you might like this magazine.  Oh yes, it does have them, but its everything you would need for OTG living.     
 
In a nutshell, I would say this is a family oriented magazine for those who want to live in a simpler time, without relying on others.  No scare tactics for the apocalypse, found here.  Articles range from Heirloom seeds, Ginseng, Geothermal Heat for the handyman, Solar Wood Dryer, Trouble Shooting Ponds, Processing Ms. Piggy, Fire Pits, Cooking on a fire and even Angling. 
 
This is a GREAT magazine for information on Urban Farmers.  I am sure there are other magazines out there specifically for just that, but this one covers lots of extras.  LOTS.   This is a 130 page magazine chocked full of information that is usable, and varied.  For a magazine this size, I first thought there would be 95% of the space for advertisers. Boy was I wrong.  There is a minimum of advertising in this magazine, however, with that comes a higher price tag.  Some one has to pay for the quality writing and I am OK with it being me.  Normally I love magazines where there are advertisements I can actually use.  After all, you never know what you need until some one tells you.  That is what advertisers do.  I am OK with that.  This magazine gives you tons of information (I know I know I keep saying that), without a ton of ads.  I can live with that.
 
With that said, I want to mention a name, Denis Prisbrey.  When I read an article I visualize some guy sitting at his laptop in some city apartment, regurgitating info from some magazine he read in 1965.  I first read an article by Denis and discovered he is the one in his pictures, actually doing what he is writing about.  Don't get me wrong, there are lots of writers out there who practice what they preach, but this was the FIRST writer I noticed right off.    Maybe its the penetrating eyes, I don't know, but I liked the articles, and found his picture to be memorable.  He contributes to several magazines and I am sure you will find his information, well defined.
 
All in all, I am sure you will like this magazine if you are self-reliant. 
 
My Likes:  Few Ads, wide ranging articles with something for everyone, Do It Yourself Section, Denis Prisbrey articles.
 
My Dislikes:  I could argue the price but I won't.  It is a bit hard to find in Canada for now.


AMERICAN FRONTIERSMAN - Premier Issue
 
If this is what can be expected for future issues, I will have a subscription shortly.  If you find this on the news shelves READ THE WELCOME FRONTIERSMAN message from the editors.   This is truly an amazing magazine for those who are Survivalists, Of the Grid, Back Country Hunters, Preppers, and any Outdoorsman / woman.  Article after Article of interesting things to do, make, eat.  It has it all.  Like The New Pioneer, this is a huge magazine (130 pages), crammed (and I mean CRAMMED) full of excellent information. 
 
Want to build a Dugout Canoe? Tan some hides? Build some simple camp tools? Build a trapper cabin? Hunt squirrel? Cook a rabbit? Make an Atlatl? Butcher big game? Build a debris hut? Learn about deer heart recipes? Practice distress signals? Find out how a snakebite affected a victim, with no treatment?  OK you get the hint,  It has EVERYTHING, even a few articles from Denis Prisbrey. 
 
There is very little in the way of advertising, which leads to the higher price. Again, I can surely live with the price considering, I have just read this magazine TWICE, AND have taken notes. I have mixed feelings about a lack of advertising, as stated previously, since I do like to see what is out there that will help me in my endeavours.  I guess I can get that info from another magazine.  If I want information on how to do things in the wild, this is a must have magazine.  I hope this is not the first and last issue.   Cheer them on, buy the magazine, and encourage them to keep on writing, this is a keeper.
 
My Likes:  EVERYTHING!  This and Backwoodsman are my favorite magazines, Sorry Charlie.  It appeals to me and what I like to do. I am a slow reader, but I retain almost everything, this one made me read it twice, just in case I missed anything.
 
My Dislikes:  I will REALLY REALLY dislike not having a second issue,  No subscriptions available YET.  Give it time. 
 
If you have any other's to recommend, let me know,  Thanks. Preppersaurus Rex

Sunday, February 3, 2013

BUILDING THE MINI ALCOHOL STOVE


THE ALCOHOL STOVE


I, like almost every other prepper, first saw these stoves on YouTube.  I decided to make one.  Don't get me wrong, I am not re-inventing the wheel here.  There are great videos on how to make these, I will show the version that I made.  If you have never seen them before, make one.  If my instructions suck, download one of the videos from YouTube and ..... MAKE ONE. 
 
Get the principles down and you won't be caught short, because, you can even make one of these with a knife, and a thumbtack.  If you are the MacGuyver type, you can make it out of a rusty key and a stick.  or was that a rusty stick and a key?   Anyhow, this is the project I worked on.   For the record, I tried various building techniques and variations of hole size, number of holes, location of holes, and can sizes.  Bottom line is they all tend to work well. 
 
The only stumbling block I found was the fuel.  In the USA there is Denatured Alcohol and HEET.  In canada we have Methyl Hydrate, Rubbing Alcohol, and Fondue Fuel.  Those are the choices I had.  Fondue Fuel tended to turn the inside of my stoves blue for some reason.  Methyl Hydrate is the stuff us Canuckians use in our gas tanks to keep them from freezing (NOTE:  They come in handy dandy little bottles that are sealed for the apocalypse, or you can buy the gallon size.)

IF YOU ARE A DUMBASS WITH TOOLS ....  GREAT.... THIS ONE IS FOR YOU.

Parts

1 - Soft drink can (2 or more if you have strong hands, because you will bend the heck out of em, I did)
hmmmmm  I guess that's it for all the parts.  Shouldn't break the bank.

Tools

1 Blade (utility knife type)
1 Utility knife (separate from the blade for convenience)
1 set of needle nose pliers
1 piece of 1 inch something or other (I use wood)
1 piece of 1/2 inch something or other ( I use wood)
1 drill
1 stapler
1 #60 drill bit (if you don't have that go no bigger than 1/16" drill bit)
1 tube of high temp gasket glue (optional)
1 thumb tack or sharpened nail (optional)

Instructions

picture stolen from the internet
 
 
Step one,  Scoring the Opening
 
 
Any pop can will do.  Take your pick, but drink the contents first.  No sense letting the beverage go to waste. 
 
With the utility knife, score the inside of the top of the can.  Don't push hard, just push and turn repeatedly until you slowly find the blade working its way into the can.   Then stop.   Push the inside of the lid down lightly but repeatedly until it works its way completely loose of the can. If you don't like the jagged edge, you can do two things.  1) take a Dremel and grind the edge smooth, or 2) take a stick, or (I used) a piece of 1 inch PVC pipe and rub it against the edge to smooth it out.  Don't rub hard, or you will disfigure the can.  You can also do this at the end of assembly as well.
 
Scoring in the bottom of the groove

Can with top removed

Step 2, Marking the Holes

Mark the jet holes around the edge of the can with a Sharpee marker.  How many holes will depend on you.  I just made mine about 1/4 inch from each other, and on the flat part of the shoulder just above the bend.  Some of my prototypes had anywhere from 12 - 28 holes, and all worked fine.

Holes marked on can for jets


Step 3, Drilling the Holes

With a #60 drillbit, (or anything up to 1/16, but make sure its small) drill the holes into the shoulder of the can.  If you are finding your drillbit wandering all over, you might try using a sharpened nail, or thumbtack to start an indent where the bit will follow.  I found if you push too hard with the nail or thumbtack, you will have dents in the shoulder after the holes are drilled. 

Countersinking the holes with a nail for easier drilling.  

Step 4, Cutting The Top and The Bottom

Scoring the Can
 
 
Steelwooling the bottom of the can
 
 
Take a piece of steel wool and lightly dust off the paint on the bottom of the can about 1 inch from the bottom.  This will help prevent crimping once it is removed from the can.  The integrity is better at this stage of the build.

Take your utility blade (not the knife) and clamp it onto your piece of 1 inch wood etc. on a flat table.  I used my table saw.  To cut the top of the can, rub the can against the knife blade, gently, to score it.  When you start to feel the blade is working through the can.  Flip the can over and do the same with the bottom of the can.   You should have two score marks on the can. 

PAY CLOSE ATTENTION HERE.  YOU HAVE SCORED BOTH THE TOP AND BOTTOM, BUT FOR NOW YOU WILL ONLY REMOVE THE TOP.

On the score line you just made below the top of the can, lightly press in and let the can metal pop back out, over and over until you see a split on the score line,  now press and repeat around the whole can, this will break the top section off.  KEEP THE BOTTOM ON FOR NOW. 

Step 4, The Inside Wall

The inside wall of the stove will create a gap between the outside wall and the inner chamber, where you dump the fuel into.  This gap is where the vaporization happens to make the jets work.  This wall will fit between the top and bottom halves of the stove, in the grooves, upon assembly.  The inside wall must be a bit wider than the top and bottom, so you will need to change the way it is cut with the blade.

I found that 1 1/2 inches worked fine for the cans I had.  So set your blade on the new jig that is 1 1/4 - 1 1/2 inches high.

The jig should be 1 1/4 - 1 1/2 inches from the table.  This is flexible


With the bottom of the can on top, score the can 1 1/2 inches from the bottom.

NOTE:  The 1 inch score mark can be seen while scoring the inside wall
 
Again, once you start to find the blade entering the can.  Stop scoring and work the metal back and forth until the pieces break free.  Do Not Force.

NOTE:   Ignore the fact that the bottom of the can has not been steelwooled.  This was to cost me later.  So don't make that mistake too.

Bottom, Inside wall, and Top almost ready for assembly
Step 5, Crimping the Bottom

With your needle nosed pliers, pinch and bend the edge of the bottom piece inward.  Repeat this around the periphery.  This will make for easy assembly. The crimp lines should only be about 1/8 inch from the edge of the can.


Step 6, Sizing the Inner Wall

With your utility knife, cut the inner wall, and remove approximately 5/8 inches of material.  This will make assembly a bit easier. 

Cut the inner wall
 

Remove approximately 5/8 inch

 
Fitting the inner wall inside the bottom

Place the inner wall inside the bottom of the stove and fit it into the grooved slot.  While holding it to size,  take a common paper stapler and put a staple into the side of the ends of the inner wall to secure its size.   Try to keep the staple about 1/8 inch from the edge. NOTE:   I found it works best to have the smooth part of the staple on the inside with the little legs folded over on the outside.  This will prevent them from snagging anything inside the stove.

Note the staple is close to the edge of the wall
 
Step 7, Flaring out the Top
 
In order to make the top easier to place on the bottom, during assembly, I found by rubbing it against another can bottom will allow the edge to stretch and flare out.  This make placing it over the bottom part easier.  Just rub it lightly over and over while on the bottom of another can.  This should flare the edge just enough to let it slide onto the bottom during assembly.

Step 8, Assembly

Take your gasket glue and run a bead around the top crimped edge of the bottom part.

Place the inside wall into the bottom half. Now place the top onto the bottom, making absolute sure it is on straight.  Be sure the crimps are not getting caught on the bottom of the top half.  Slowly, and with even pressure, push the top down onto the bottom while making sure the inner wall doesn't get hooked on the edge of the top opening.   Did you get all that?

Wipe off the excess glasket glue and let sit until dry.  Be sure that the top is on straight.  When the gasket glue is dry,  Take the pvc pipe and rub it inside the opening of the stove to push the rough edge closer to the inner wall.  You can now 1) fire it up, or  2) steelwool the paint off the top and make it pretty, then FIRE IT UP. 

Add some fuel to the inside opening and light the fuel.   It should take about 1 - 2 minutes for the can to heat up enough where vaporization will kick in and the jets will self ignite.  This is the Happy Time, when you first see the jets start to ignite. 

 
Difficult to see in the photo but the jets have just started to ignite.  Once they are all burning.  Place your pot of water / soup etc on the top of the stove and heat it up.


My timing showed it took 5 minutes to get the 3 cups of water to start boiling. 

NOTE:  I have seen 100s of variations of this little dream.  All seem to work fine.  So it is fairly difficult to screw it up totally.  Gasket Glue doesn't need to be used but I did it and it worked.  You can also make a wind screen and even a holder for it...  as I said, it is endless.   ENJOY.


Saturday, January 12, 2013

STARTING OUR AQUAPONICS

AQUAPONICS R US

We've heard a lot about Aquaponics / Hydroponics and never gave it much thought until someone explained it in simple terms.

"Fish Poop, Fish Poop is pumped into Grow Beds, Plants eat Fish Poop, Plants Poop, Plant Poop is pumped into Fish Tanks, Fish eat Plant Poop.":   We then go fishing and eat fish and plants.  Simple?

These systems can be set up anywhere. I chose to make a dedicated table for ours.  We already had the countertop for another project so that didn't cost anything. 


There are 3 components for a basic Aquaponics system.  The Fish Tank, The grow Beds, and The Pump.  We used two storage bins from Rona to use as our Grow Beds.  They were flat bottomed, 10 inches tall, 24 inches long, and 16 inches wide, and big enough for a good starter system.  The Fish Tanks, and Sump Tank (Where the pump is used) are 68l Rubbermaids. 

Each Grow Bed needs and intake and a drain.  This is the drain system.  The snorkel (white PVC) is 5 inches tall.  This will allow the water to be pumped up to this height before starting to drain into the fish tanks.  Timing can be off with the flow from the pump, so this design allows the pump to pump a little longer than needed without fear of overflowing the Grow Bed.  The 3 inch ABS pipe with the holes in it allows the water to flow freely out the drain without fear of media blocking the drain.  This keeps it away.


This photo shows the ABS screen tube in place over the PVC drain pipe.


Each Grow Bed needs to have an intake coming from the pump.  We found these fittings at a local pond supply.  


In order to keep the media from blocking the intake I made this screen tube from a PVC connector, with a screen glued to the top.  This one fit onto the intake fitting perfectly.  Media can be totally surrounding the intake and no worries of it plugging.


This Photo shows the PVC screen in place over the intake.


Under the table, is where the hoses are fitted.  The yellow hose are connected to a T and then a ball valve, which goes to the pump.  The clear tubing brings the water back from the Grow Bed to the Fish Tank.  In the back ground you will notice a tube connecting the Fish Tank to the Sump Tank where the pump is housed.  As the water flows out of the Grow Beds, it flows into the Fish Tank.  Since there will be more water than the Fish Tank can hold, it now flows into the Sump Tank, full of Fish Poop, and ready for pumping into the Grow Beds. (NOTE the wood shelf in the middle,  This houses an air pump to bubble oxygen into the fish and sump tanks.)


The pump must cycle long enough to fill the Grow Beds to drain level for a specified amount of time.  Then it shuts off long enough for the water to drain out to the level of the PVC drain.  All this water flows into the fish tanks where the nutrients from the plants feeds the fish..   


This is the underside of the cabinet showing the intake hoses from the pumps


Note the ball valve on the pump hose.  This allows more control over the flow of the intake, as well as a means of draining all the water out of the Grow Beds if needed.


Here Denise fills the beds with Hydrocorn, the media where the plants will grow.  Make sure you rinse it thoroughly to remove dirt and dust. Now comes the fun part. timing the system and checking it for nitrates, nitrites and ammonia.  We will cycle this for a few weeks before any fish and plants are introduced.